OVH的新面板提供的系统模板比较少,想装CENTOS 8 STREAM都没有,拿到的这台机器IPMI一挂载ISO就崩溃闪退,发TK检测了又说没问题(他们只检测了是否能连接机器,而不是检测功能是否正常)。因为这是台硬盘中奖机,也不想和他们扯皮了,自己试图解决,虽然有IPXE,加载了netboot.xyz用网络安装了CENTOS 8 STREAM,但后面不会怎么搞在硬盘启动了(小白兼懒癌)。于是退而求其次就用官方的CENTOS 7.9模板,装完后发现内核较低装不了魔方和BBR,手动升级内核后重启发现启动被锁死为旧的内核,想起了安装界面似乎没有勾选安装发行版内核的选项,啊!简直要崩溃了。
以下列出的为目前OVH支持安装的系统模板:
"alma8_64"
"alma9_64"
"centos7_64"
"debian10_64"
"debian10-iaas_64"
"debian11_64"
"debian11-iaas_64"
"debian9_64"
"debian9_armhf_32"
"fedora36_64"
"ipxe-validation_64"
"recycling-tpm_64"
"rocky8_64"
"rocky9_64"
"sles-sap15sp3_64"
"ubuntu1404-regular_caas_64"
"ubuntu1604-openstack_64"
"ubuntu1604-pci_64"
"ubuntu1604-server_64"
"ubuntu1804-openstack_64"
"ubuntu1804-server_64"
"ubuntu2004-server_64"
"ubuntu2204-server_64"
"win2019core-dc_64"
"win2019core-std_64"
"win2022core-dc_64"
"win2022core-std_64"
"win2016-dc_64"
"win2016-dc-new_64"
"win2016-std_64"
"win2016-std-new_64"
"win2019-dc_64"
"win2019-std_64"
"win2022-dc_64"
"win2022-std_64"
"win2016-std-sql2014std_64"
"win2016-std-sql2014web_64"
"win2016-std-sql2016std_64"
"win2016-std-sql2016web_64"
"win2016-std-sql2017std_64"
"win2016-std-sql2017web_64"
"win2016-std-sql2019ent_64"
"win2016-std-sql2019std_64"
"win2016-std-sql2019web_64"
"win2019-std-sql2016std_64"
"win2019-std-sql2016web_64"
"win2019-std-sql2017std_64"
"win2019-std-sql2017web_64"
"win2019-std-sql2019ent_64"
"win2019-std-sql2019std_64"
"win2019-std-sql2019web_64"
"win2022-std-sql2019ent_64"
"win2022-std-sql2019std_64"
"win2022-std-sql2019web_64"
"alma8-cpanel-latest_64"
"alma8-plesk18_64"
"centos7-cpanel-latest_64"
"centos7-plesk18_64"
"debian10-plesk18_64"
"nutanix-5.20-cluster_64"
"nutanix-5.20-node_64"
"nutanix-6.5-cluster_64"
"nutanix-6.5-node_64"
"proxmox7_64"
"esxi65_64"
"esxi67_64"
"esxi70_64"
"win2016-hyperv_64"
"win2019-hyperv_64"
关于手动修改IPXE启动netboot.xyz,可以在API界面自行添加自定义的iPXE script,具体操作查看以下:
iPXE customer script (BETA)
如需转载请注明出处。https://madlax.pw/2022/11/436.html
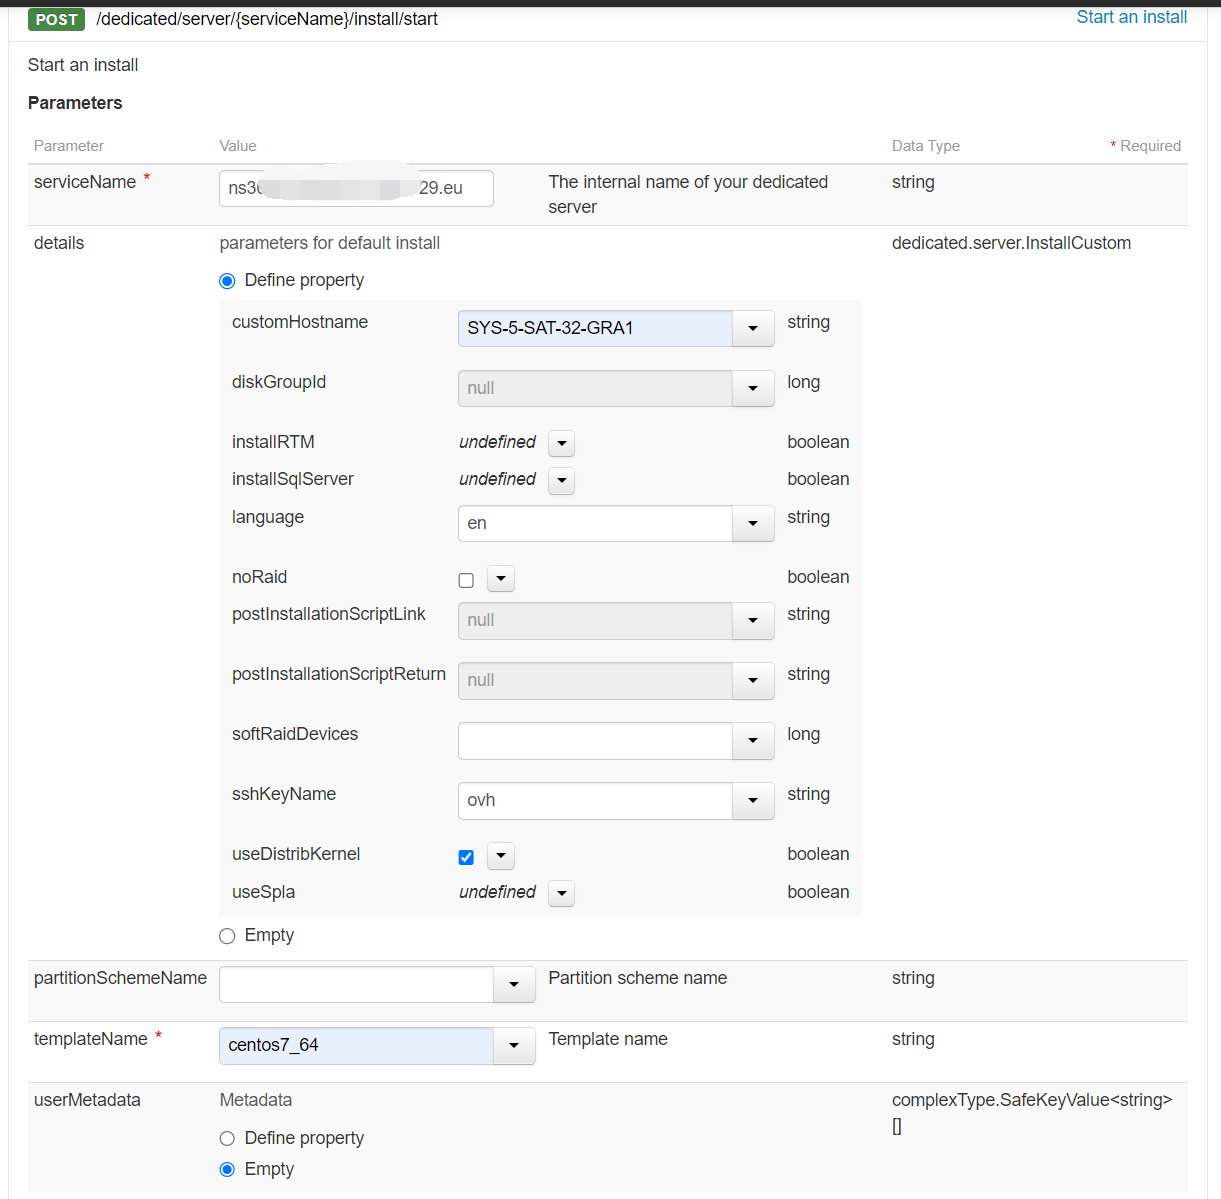
以下回到正题,在API界面翻找的时候发现了API安装系统那有useDistribKernel的选项,好家伙,这被藏起来了。
找到
POST /dedicated/server/{serviceName}/install/start
这项按下图提交即可安装发行版内核的系统了。

API里的参数如下:
serviceName就是你服务器开通时显示的那个NSxxxxx-xxx-xxx-xxx.eu格式的
diskGroupId没搞清楚是什么。
installRTM是实时状态监控我没安装。
installSqlServer应该是数据库服务器吧我没装。
语音必须小写“en”。
noRaid为raid选项,勾了就单盘安装。
下面postInstallationScriptLink和postInstallationScriptReturn是安装后运行的脚本和返回值,可以做一些软件安装和初始化设置之类的吧。
softRaidDevices这个我没搞清楚怎么填,空着好像没没见问题。
sshKeyName是你保存在OVH的SSHKEY名称。
useDistribKernel使用发行版内核,记得勾上。
useSpla使用授权的凭证,例如cpanel或WINDOWS的。
partitionSchemeName这个没弄明白,空着也没问题。
templateName模板名称,在上面列表里,至于自定义模板是否可以用还没有试。
userMetadata可以做一些初始化设置,应该用的是cloud-init,这个我不会所以选了Empty,会的话这里安装就简单了。
这个提交安装的是RAID1,如果需要修改RAID参考下文:
OVH(Soyoustart、Kimsufi)设置IPV6,变更RAID
如果你找到能在API上直接安装RAID0的方式希望能在评论区回复告知,多谢。
最后折腾了一圈下来,发现其实只要在BOIS里加个EFI启动选项再调整启动顺序就解决了。
最后折腾了一圈下来,发现其实只要在BOIS里加个EFI启动选项再调整启动顺序就解决了。
最后折腾了一圈下来,发现其实只要在BOIS里加个EFI启动选项再调整启动顺序就解决了。
蛋痛。
如需转载请注明出处。